Simulating fluids within a moving container often introduces collision errors and bottlenecks that can substantially increase simulation times. On this page, I will describe the issues that one would typically encounter and how to get around them.
Throughout this article, I will be using a scene of a bottle being tossed up in the air as an example. The goal here is to simulate water inside of the bottle, which should react appropriately to how the bottle is moving. The bottle is not capped, so some water should spill out while it’s in the air.
The Problem(s)
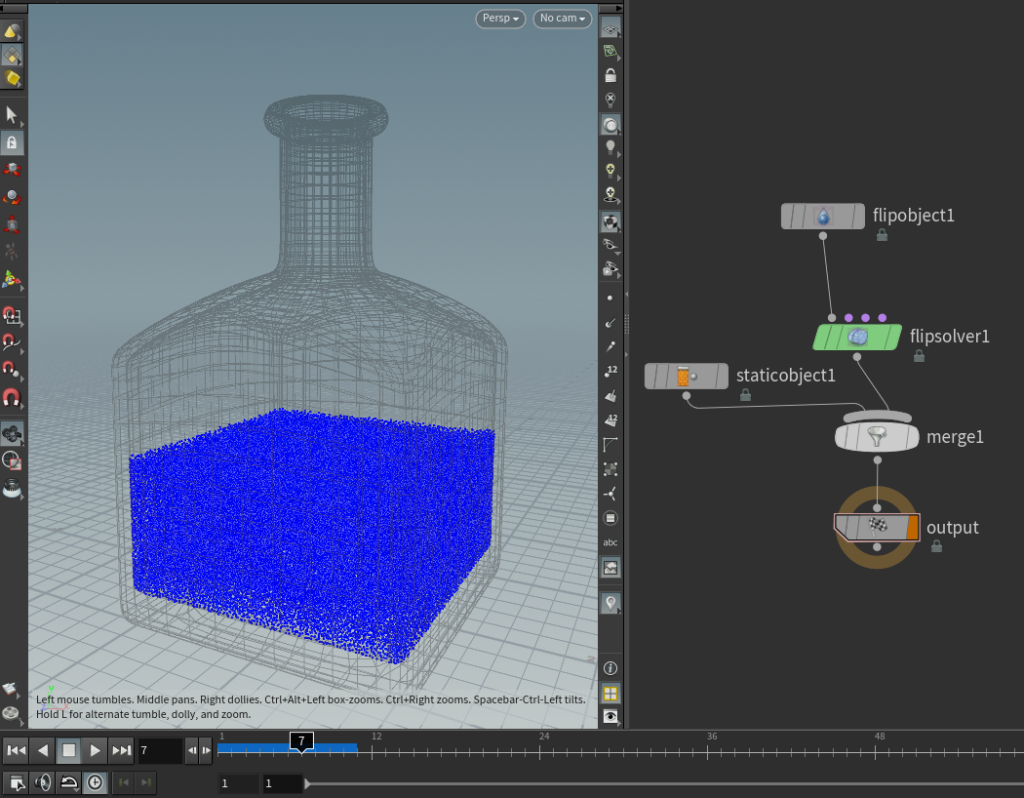
For starters, let’s set up this simulation as you typically would. Initialize a body of water on the first frame, drop down your standard FLIP nodes in a DOPnet using the bottle as a static object and hit play.
Well, that doesn’t seem correct. Most of the particles aren’t staying inside the bottle as it flies upwards.
Resolution and Substeps
What’s happening here is that the particles aren’t detecting a collision with the walls of the bottle because:
- The walls are too thin. If the volume resolution of your simulation or collision is too low, the the thin walls of the bottle may not be picked up by the simulation.
- The bottle is moving too fast. There just isn’t enough substeps for the particles to gradually collide with the moving bottle. If the bottle moves a large distance over a single frame, on 1 substep, the bottle is basically teleporting from one location to another rather than “moving”.
The solution to these problems don’t seem too hard to rectify, increase the resolution so that the thin walls of the bottle is being registered and increase the substeps so that the bottle doesn’t move too rapidly between each solve. But this would result in a really long simulation time.
Stray Particles
Even if you do have the time to wait for a really long simulation, depending on how your collider is moving, some particles may still glitch out of the container. Realizing you have to restart your simulation after waiting an hour for 10 measly frames sure isn’t fun.
Deleting the unwanted particles post-sim might be a viable solution but may still cause certain problems.
- If you’re not managing the bounds of your simulation and updating it every frame to only fit around the bottle, the size of your FLIP sim’s volumes will quickly balloon into a huge area as particles that are falling stray further away from the container.
- On top of the high voxel count that you need to capture the thin walls of your container, this makes the simulation ridiculously long as now there are a bunch of unwated voxels that FLIP is trying to solve.
You might also try using a SOP Solver DOP to delete any points outside of your container on every frame of your simulation, but if too many particles manage to escape and get deleted, you may start to see significant volume loss in your fluid.
In my example, because some water is supposed to be spilling out the uncapped end of the bottle, restricting the bounds to just the bottle isn’t a viable solution.
Moving Collider
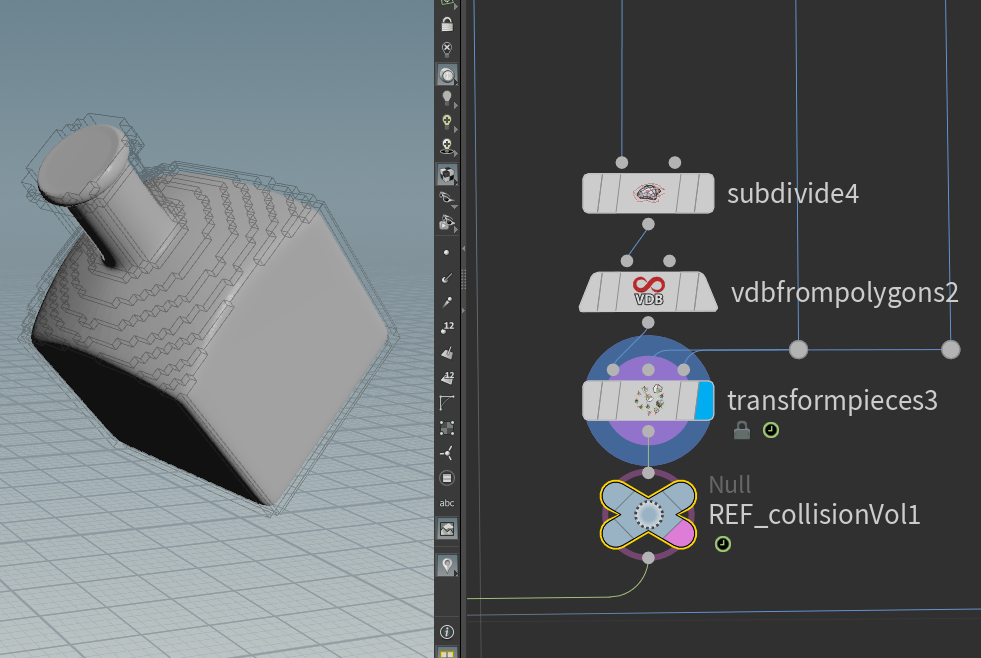
I like to use Volume Sample mode in my Static Object DOPs when I am doing FLIP sims as I’ve just found this to yield better results. Typically, I would create an SDF back out in SOPs then link it to my static object.
The problem here is that using the VDB From Polygons SOP with an animated input causes it to calculate every frame/substep and this isn’t a fast operation. Especially if you need the resolution to capture the thin walls of the bottle.
Thankfully, this easy enough to fix by creating the volume at the rest position first then transforming it to follow your animation.
If, for some reason, the collider you are using is deforming, then you may just have to deal with the extra time this incurs. You may choose to cache out your collision SDF but be careful about the sub-frames needed for your substeps to work.
However, with everything else in consideration, the other issues listed above make it really impractical to work with this setup.
Simulating the Fluid Inside The Container
Instead of trying to simulate the liquid whilst its moving 50 units per second, instead we can simulate the liquid inside the bottle first (at rest), then move it back to flying at mach speed through the air, post-sim.
Since we are just simulating the bottle at rest, we can decrease the volume bounds of our simulation to be just big enough to hold the size of the bottle, making sure no unnecessary voxels are being solved. As for the water that is supposed to be spilling out, we’ll tackle that later.
To account for the thin walls, lets “thicken” the walls all the way to the bounds of the sim, so that there isn’t (much) chance of any particles clipping out of the bottle. To do this, we can create the collision SDF just from the inner walls of our bottle, then inverting it (multiplying your SDF volume by -1).
After setting all that up, let’s look at the simulation. The water settles to the bottom of the bottle as expected.
This is great if the bottle isn’t moving and you didn’t want to simulate anything anyway, but we need to reintroduce the forces affecting the liquid when its flying through the air, which are:
- Gravity
- Movement of the bottle
The idea here is that, instead of moving and rotating the container that holds the liquid, we rotate the forces affecting the liquid instead, which is way cheaper to calculate compared to accurate collision detection of a thin, fast-moving object.
In other words, we’re going to simulate the liquid in the container’s local space rather than world space.
Rotating the Forces
Use an Extract Transform SOP to get the transformation of your animated container as a point. This moving point in space should come with a p@orient attribute. This point will be used for transforming our FLIP simulation back to where its supposed to be (world space) later. But for now, the orient attribute is what we will use to rotate our forces.
Before we apply this orientation to our forces, we actually need to invert it first, as, for example, if the bottle is being rotated 90 degrees in the X-axis, we actually want to rotate the gravity -90 degrees in the X-axis, such that it will be correct.
Drop down a Geometry Wrangle DOP in your DOPnet. Change the parameters in the Inputs tab to reference the transformation point. And with the wrangle set to run over points, do:
//Geometry Wrangle DOP, running over points, connected to 2nd input of FLIP Solver.
vector4 orient = point(1, "orient", 0); //I have my extracted point set as the second input, thus the "1" here. This may be different for you.
vector4 orient_inv = qinvert(orient);

vector gravity = chv("gravity");
vector rotatedGravity = qrotate(orient_inv, gravity);

v@force += rotatedGravity;Since this acts as the gravity force for the simulation, make sure you didn’t put down a Gravity Force DOP in your node tree out of habit.
OK, lets do some testing to see if this is working. The bottle’s animation might be moving/rotating too quickly to decipher if everything is working as it should. Instead, I will just rotate the bottle to be upside down and plug it into our set up.
The simulation looks a little strange initially, but when the its copied to the point from the Extract Transform SOP, it looks to be behaving correctly.
We will also need the velocity of the bottle to emulate the movement of the bottle affecting our liquid simulation. If your container’s animation is from a RBD simulation as mine is, the v@v attribute should already be present, if not, use a Trail SOP set to Compute Velocity to get your velocity attribute. Back in the geometry wrangle, add this velocity as a force:
//Geometry Wrangle DOP, running over points, connected to 2nd input of FLIP Solver.
vector4 orient = point(1, "orient", 0);
vector4 orient_inv = qinvert(orient);

vector gravity = chv("gravity");
vector rotatedGravity = qrotate(orient_inv, gravity);

vector bottleVel = point(1, "v", 0);
vector rotatedBottleVel = qrotate(orient_inv, bottleVel);

v@force += rotatedGravity;
v@force += rotatedBottleVel;Checking in on our simulation, now even at 1 substep, the simulation is pretty stable and fast.
For 100 frames, this only took around 3 minutes.
If your resolution is really low (like in the image above), you may find that some particles are still clipping out and getting stuck outside the container, but its easy enough to delete them with a Group SOP post sim. I’ve found that when the resolution is higher/ when there are more substeps (which your final simulation should be/have), this doesn’t really happen.

If your shot involves the bottle of water shrinking or growing, the Extract Transform SOP can also extract a uniform scale (f@pscale attribute).
You can then scale the forces by the reciprocal of the pscale (if your pscale is 5, multiply the forces by 1/5, or if your pscale is 0.2, multiply the forces by 5.).
Now that everything is working (and faster), I can dial in the settings for my FLIP sim and increase its resolution/substeps. In the case of my example, I’ve increased the reseeding’s surface oversampling, as well as enabled particle separation to get a nicer and more even water surface.

Simulating Water Spilling Out of the Container
If your fluid is supposed to be fully encapsulated in the container, you’re basically done. But, if you have an open container and water is supposed to be spilling out of it, currently, the water that goes out of the bottle’s interior just disappears as its being culled by the simulation bounds.
Or, if you had closed boundaries turned on, the water will bounce back and not “spill out”. If you do want water to spill out, turn OFF closed boundaries and run your simulation again as the particles disappearing out of the sim is the desired behavior.
Sourcing
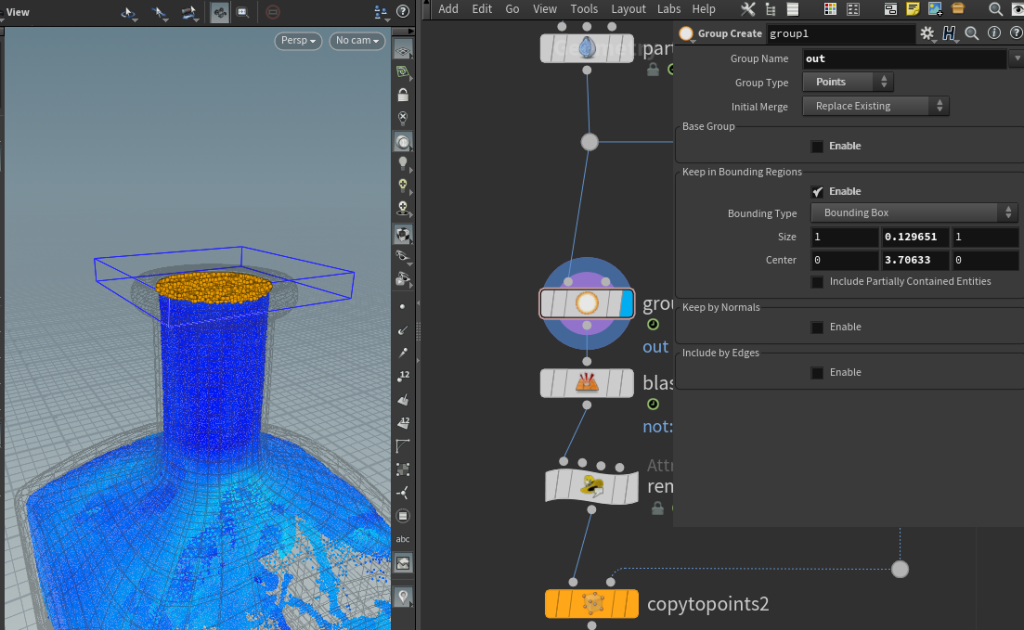
What we’re going to do is to take the particles that would have spilled out of the container, and source them into a separate (world space) simulation. Take a Group SOP and use its bounding box feature to group the points near the opening of your bottle.
Using a Point Wrangle, I am going to detect which particles are going upwards and out of the bottle with a dot product and delete the rest. I am also going to advect the particles out by 1 frame so that they are not immediately intersecting with the bottle when I source it into the simulation:
//Point Wrangle,
// with 0th input as particles that are exiting the bottle
if (dot(normalize(v@v), {0,1,0})<0){ //this checks how similarly the direction of the velocity is against a {0,1,0} (up) vector.
removepoint(0,@ptnum);
}
v@P += v@v/24; //or whatever your FPS is, mine being 24 here.Then use a Copy To Points SOP to move the particles into world space.
Since we are essentially “un-parenting” our fluid from the container, I’ve found that adding the velocity of the bottle back to the liquid helps it behave correctly:
//Point Wrangle,
// with 0th input as particles that are exiting the bottle
// & 1st input as the extracted bottle's transformation point
vector bottlevel = point(1, "v", 0);
v@v += bottlevel;The resolution of this “outside” simulation can be different. To account for that, I’m going to convert these source particles to a VDB volume, then scatter points inside it to match the resolution/particle separation of our new simulation.
Create a new DOPnet and set up a standard FLIP simulation then source in the particles using a Volume Source DOP. Make sure to create a gravity force this time.
This new simulation resembles our initial (scrapped) setup with a few differences. We are running into a few of the problems listed at the beginning of this article again:
- Moving Collider means calculating an SDF every frame.
- Liquid travelling large distances makes FLIP’s volumes really large.
Moving Collider
We’ve already solved this issue previously by turning the mesh into a SDF first at rest before transforming it.
However, now that there is no need for the inside of the bottle, we can delete the inner walls of the container (and using a Polyfill SOP to close any holes) then create the SDF. Without the thin walls, we can afford to have the resolution of this SDF be much coarser.
Large FLIP Volumes
There isn’t really a way to cut down on the size of the volumes that FLIP creates if the liquid spilling out really is covering a large area. But of course, we can do some standard optimizations.
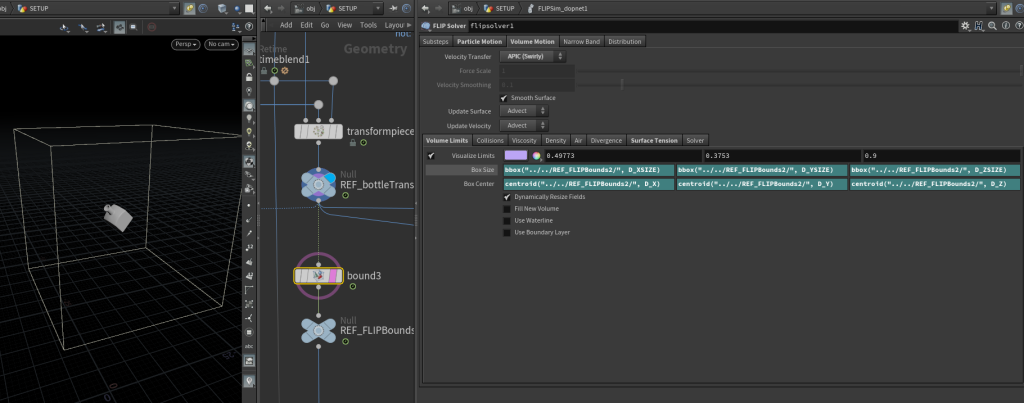
In my shot, the camera follows the bottle, so I can just limit the sim’s bounding box to around where the bottle is using a Bound SOP and some HScript Expressions under the solver’s Volume Limits.
I will want to simulate this at a high enough particle count to capture the details of the fluid/ get a better meshing surface. So, I will decrease the Particle Separation, but this means that the volumes’ resolutions automatically increase as well.
Since the bounds of my sim will span a large area, I don’t want my volumes to be too high-res. So, to lower the resolution of the volumes, I’ve increased the Grid Scale on my FLIP Object DOP.

The voxel size of the volumes created by FLIP is determined by Particle Separation * Grid Scale. Which means if your particle separation is 0.01, and your grid scale is 2, the voxel size of your volumes is 0.02.
The voxel size can sometimes get really tiny when you’re trying to increase your particle count using particle separation, and may be more detailed than you would realistically need for a small scale sim.
You can “preview” the size of each voxel by just creating a box with that value as its scale.
Finally, to bump up my particle count even more to get a nice surface when meshing, I’ve increased the number of Particles Per Voxel under Reseeding.
Putting Everything Together
Now that everything is all set up, simulate the outside particles then merge the results of the 2 simulations together.

The process of meshing the particles into renderable polygons is pretty standard, you may have to do some dilating and smoothing around the opening of the bottle, but nothing too crazy.
You may want to peak out the faces of your liquid that is touching the inner walls of your container, such that the liquid is deliberately intersecting the container to prevent Z-Fighting when you’re rendering.
If your liquid and container are both going to be assigned transmissive shaders, this also helps set you up to utilize nested dielectrics in your render engine of choice.
Conclusion
Of course, what I’ve described above probably isn’t the only way to do this and I may have even gotten some things wrong but I think this is a pretty workable set up and the results don’t look too off.
The concept of rotating and manipulating forces this way isn’t unique to this use case. There are probably lots of other scenarios where you would want to keep your collider static and rotate everything else instead.
If you have any questions or feedback, feel free to drop me a message on linkedin or email me!